Enjoy Discounts on Oakley & Rayban Eyewear Until Supplies Last! SHOP NOW

Full Page View
Lookbooks and News
Tags
RECENT POSTS
create Legacy Team1
access_time May 03, 2021
create Legacy Team1
access_time April 21, 2021
create Haus Strom
access_time August 15, 2020
create Haus Strom
access_time March 20, 2020
create Haus Strom
access_time March 19, 2020
create Haus Strom
access_time March 16, 2020
create Haus Strom
access_time March 12, 2020
create Admin Two
access_time March 10, 2020
create Haus Strom
access_time February 28, 2020
create Haus Strom
access_time February 27, 2020
create Admin Two
access_time February 24, 2020
create Haus Strom
access_time February 21, 2020
create Haus Strom
access_time February 18, 2020
create Haus Strom
access_time February 14, 2020
create Haus Strom
access_time February 13, 2020
create Haus Strom
access_time February 11, 2020
create Legacy Team1
access_time February 10, 2020
create Haus Strom
access_time February 06, 2020
create Haus Strom
access_time January 29, 2020
create Haus Strom
access_time January 28, 2020
create Haus Strom
access_time January 24, 2020
create Haus Strom
access_time January 23, 2020
create Haus Strom
access_time May 09, 2018
create Haus Strom
access_time May 08, 2018
create Haus Strom
access_time February 13, 2018
create Haus Strom
access_time November 02, 2017
create Haus Strom
access_time October 02, 2017

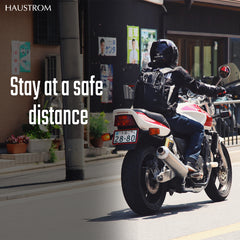
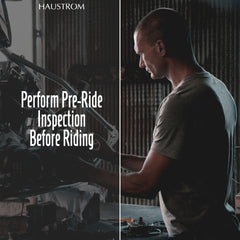
The standard rule of any motorcycle rider’s safety is to ensure a safe ride, every ride. And one of the key factors to that is making certain your motorcycle or scooter is in the best condition for the ride.

Whether parked for a few hours or a few weeks, it is very important to take the time before each ride to check its condition and look for problem areas. A motorcycle pre-ride inspection is just one of the methods to managing your risks and reducing them. By doing a pre-ride inspection you can discover a problem before it’s happened and take care of it right away. Just follow the steps below.

Whether parked for a few hours or a few weeks, it is very important to take the time before each ride to check its condition and look for problem areas. A motorcycle pre-ride inspection is just one of the methods to managing your risks and reducing them. By doing a pre-ride inspection you can discover a problem before it’s happened and take care of it right away. Just follow the steps below.

Pre-Ride Inspection Before Riding

Walk Around Your Motorcycle

Simplest method is to walk around your motorcycle and give it the once-over with your eyes and hands. Starting at your left side and at the side stand and walk clockwise. The motorcycle pre-ride inspection only takes a few minutes and can point out little problems that could turn into some major ones before they do.

Assemble Checks Into the Following Categories:

  • Tires and wheels: air pressure, spokes, rims, seals, brakes, brake pads, brake function
  • Controls: levers, pedals, cables, throttle, hoses, mirrors
  • Electrics and lights: battery, headlamp, turn signals, horn, switches, wiring
  • Fluids: fuel, engine oil levels, hydraulic brake fluid, coolant.
  • Chassis: chain (final drive) frame, suspension, bolts and fasteners.

Pre-Ride Inspection

  1. Side-stand and centre-stand: firmly held in place and operating smoothly. For example, it would be a hazard of course if this deployed or came loose while riding.
  2. Shift lever and left foot peg: function, bolts, and fasteners and drive chain: check loose or tight and that it’s greased enough.
  3. Left side fairing fasteners. If not applicable, check engine for any visible oil leaks, loose fasteners, electric cables etc.
  4. Front forks, front tire and valve, rim, brake calliper and discs. Look for oil seepage around fork seals; check for nails or embedded items in tire tread; check tire tread depth/wear; check tire pressure; look for rim dents or loose spokes if applicable; look for fluid leaks at brake calliper; inspect brake disc for dint/bends or uneven wear.
  5. Clutch lever, brake lever, switches, cables, and throttle Check for clutch cable wear and smooth operation. Check brake lever and that front brake system is working. Check brake fluid levels (window) both front and rear. Twist throttle to check for good movement and spring back. Check engine kill switch operates smoothly.
  6. Rear brake pedal operation, right foot peg, oil level (window) Check for under bike leaks (here easier to see if engine oil leaking with bike leaned more to left on its side stand). Observe fasteners, cables, etc.
  7. Rear tire, brakes/pads, disc, suspension, seat, license plate holder Same as number #4 but check suspension spring in place of forks. Be sure seat is fastened as well as license plate. Check all fasteners.
  8. Lights, signals, horn Turn the ignition on check horn, lights, signals and tail/brake light. Depress rear brake pedal and check brake light illumination as well as with pulling the front brake lever. Check high beam.
  9. Fuel, coolant and mirrors Ensure you have enough fuel and that if you have a liquid cooled bike, check that no leakage is noted. Does the bike have plenty of gas and the right amount of oil?

Post Ride Inspection

Give your motorbike another once-over after you’ve parked it and turned it off. Use your eyes and hands as you did before the ride, checking for anything that may have come loose or started leaking.

While your motorcycle is still warm lubricate your drive chain, if you have one and especially if you’ve been riding in the rain. The chain is always greased when warm allowing for the lubricant oils to stay gooey and soak into the chain rather than coagulating in globs just to fly off on your next ride. And this usually means gobbing onto the sidewall of your tire! along with this, be sure to check your chain tension once again.

When the engine has cooled, give your bike a wash. This is a good time to further inspect your motorcycle for loose bolts, fasteners, fairings, leaks or broken parts.

Source: motoress.com
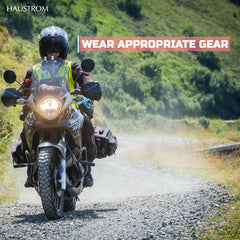
Shop For Street Motorcycle Gear

RELATED POSTS